
Racewell Auto Drafter Manual
Thank you for purchasing a Racewell Auto Drafter. This guide contains all the necessary information to help you set up your equipment and begin your first weighing and drafting session. For additional information, please contact us using the details provided on our website.
Please read and understand the instructions before operating your Racewell Auto Drafter.
Product Overview
The Racewell DR Auto Drafter is a highly efficient, dedicated weighing and drafting sheep handling system that will help any sheep producer improve the profitability of their operation.
Features Include:
- Dual operation controls; a remote to control entry/exit and drafting gates plus easy-to-use buttons on the top of the machine.
- Automatic entry gate that is activated by twin adjustable ‘magic eyes’ for optimum speed and flow.
- Self-contained steel frame for easy positioning on uneven ground.
- Quiet pneumatic operation.
- Integrated overhead load cells eliminate load bar failures and cable damage.
- Rugged, hot dip galvanized construction and a well-proven design for long life and high resale value.
- Low entry height for improved animal flow.
- Mounting points for ease of attaching lead-up panels.
- Powered by a 12V battery or mains power cable.
Racewell DR3 Auto Drafter
The Racewell DR3 Auto Drafter is a highly efficient, dedicated weighing and 3-way drafting sheep system.
Racewell DR5 Auto Drafter
The Racewell DR5 has all the features of the DR3 with two more drafting gates making this unit ideal for producers finishing lambs in large quantities.
Optional Trailer System
The Racewell DR Trailer System makes set up and pack up quick and easy, approximately 2 minutes. The innovative design means the Racewell DR can easily be positioned right up close to the sheep race. The trailer is supplied with suspension and a jockey wheel.
Racewell DR3 Components Diagram


Racewell DR5 Components Diagram


Installation Requirements
Power requirements
Racewell Auto Drafters require a compressed air supply plus a 240v or 12v battery power supply.
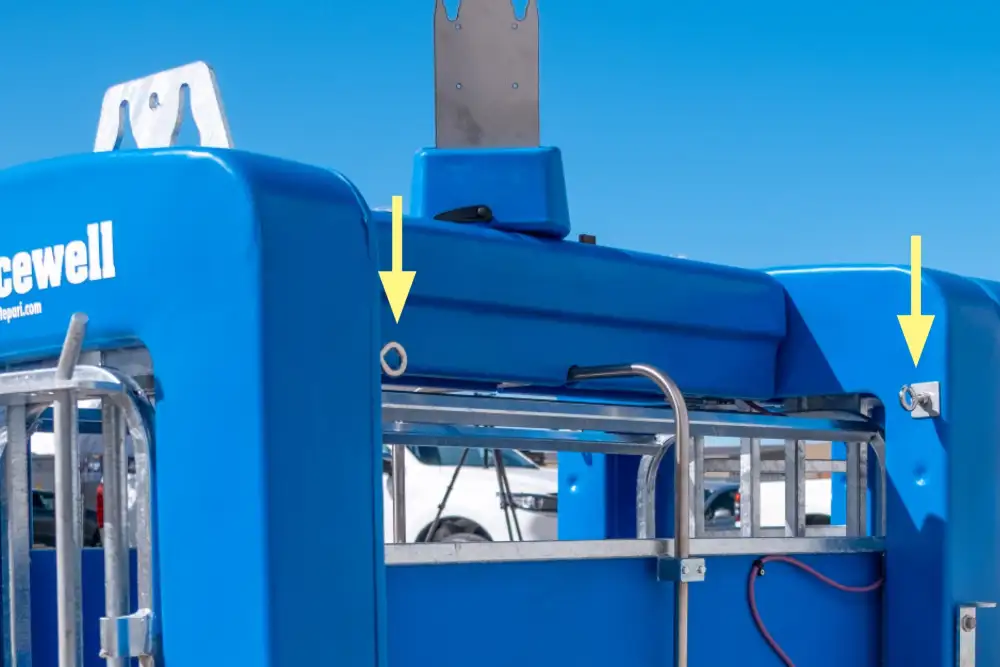
Lifting and tie-down points
Racewell Auto Drafters have 2 steel rings on each side of the machine for lifting and use as tie-down points. The strong steel frame is independent of the weigh crate so it will read accurate weights without having to be on level ground.
Compressor
We recommend a 7 or 8 CFM belt-driven compressor capable of a minimum of 90 psi. If the compressor is too small the Racewell will run slowly and may not operate properly.
The compressor does not need to be close to the Racewell, in fact having it at some distance is better for sheep flow as it reduces noise levels in the working area.
It is important to run compressors in a well-ventilated area as close as possible to a main supply near a switchboard – this avoids the use of leads that can affect the power input.
From time to time the oil level on the compressor dipstick should be checked. Water should be drained from the air reservoir after every use.
Attaching the air fittings and connecting the compressor
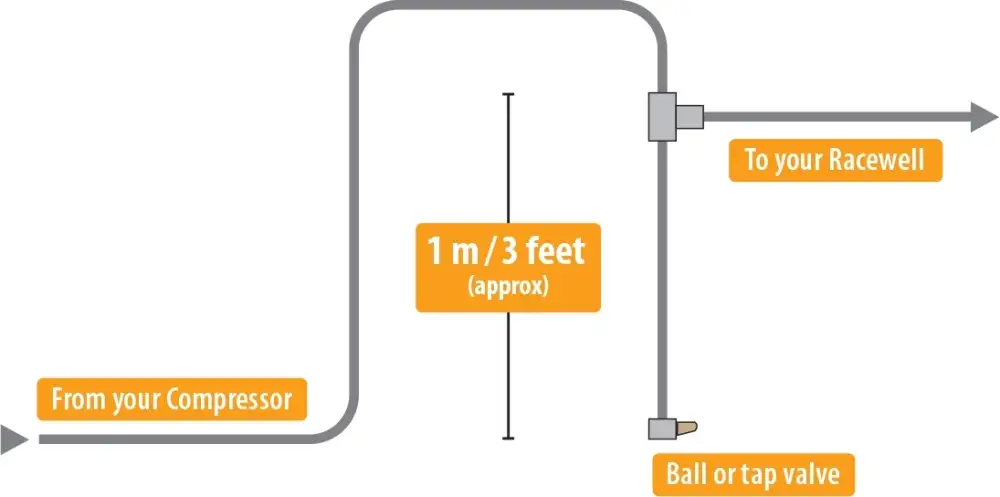
Connect the air from the compressor to the Racewell via a standard 15mm (1/2 inch) alkathene water line.
We recommend the airline configuration shown below for the best performance from your compressor and Racewell Auto Drafter.
This provides a purge tap or ball valve, which allows condensation to be periodically removed from the air system. Assemble the airline and connect to the compressor. Plug the compressor into a power source and turn it on. Finally, turn the compressor on. Always turn the compressor on or off at the unit and not the power source.
Note: When turning the compressor on or off, use the switch on the compressor and not the switch at the power source. This applies to all compressors, because air is not discharged, the compressor is being asked to start under load and this can burn out its capacitor.
Remote Control
The easy-to-use remote controls allow the operator to control the machine from the back of the race.

Dashboard Controls
The list below explains the operating options on this unit.
Exit Gate Button
The exit gate button operates the front exit gate. Push this button to open the exit gate and push it again to close the exit gate.
Draft Switch
This switch manually opens and closes either the left-hand or right-hand drafting gates.
Note: When in auto draft mode, this switch must be in the centre position.
Auto/Manual Switch
This switch selects either manual or auto operation.
On/Off Switch
This is the master power switch that turns the machine on or off. We recommend turning this switch off when the unit is not in use.
Entry Gate
Push this button to open the entry gate, and push it again to close the entry gate. The gate button works in either manual or automatic operation. The sensor eye will also trigger the gate to close when in auto mode.

Operating Instructions
The sensor eyes activate the closing of the entry gate. They can be moved along the sensor rail to different positions to adjust the timing of the entry gate.
There are two different heights you can position the eye sensors on. The lower rail is used for young or small stock and the higher rail should be used for mature or large breeds.
Below is a general guide to positioning the sensor eyes for the most efficient setup.
Try the settings below to see how the sensor eyes operate and learn the best positions to suit the varying sizes and speeds of animals in your operation.


Note: The speed of the animals entering the Racewell Auto Drafter will also affect the required eye position. Wool, dust and debris covering any of the eyes can affect their operation. Make sure that the lenses of the eyes are clear at all times.
Trouble Shooting
- Please check this troubleshooting guide before ringing customer support, as often something quite simple could be the problem.
- A service charge will be made for callouts if the fault is not covered by your warranty.
- For your safety, and that of others, never leave the unit operational when not attended.
| Symptom | Possible Causes | Possible Solutions |
|---|---|---|
| No power at unit and it won’t go | 12v adapter not getting power | Check the12v adapter jug cord is firmly connected. |
| Faulty extension cords to 12V adapter Wire loose/off in auto box | Check all extension cords. | |
| No air to unit | Check wiring generally for breaks or chew marks. | |
| Check the airlines and compressor. | ||
| Unit doing unusual things | Fluctuating power supply | Check power and compressor and for stable weight |
| Faulty compressor | Check compressor is operating correctly | |
| Entry gate shutting before sheep enter | Magic eyes obscured by dust or wool | Check the magic eyes for dust on the lenses |
| Also check they have no loose wool in front of them | ||
| Drafting the wrong way for preset weights or drafting gates hit and stick together when on Auto | Draft switch fault | Ensure the manual draft switch is in the central position |
| Everything works apart from the drafter | Indicator not communicating with drafter | Check comms cable for damage. |
| Ensure auto drafting option on your indicator is active | ||
| Remote control is not working properly or at all | Flat remote-control battery | Check battery and replace as required. |
| Remote is not programmed to your unit | Program remote to your unit by turning on the unit then: | |
| - For a Racewell remote, turn the machine Off and then On and press down the Entry and Exit buttons for 10 seconds. | ||
| - For a 4 button remote: press down buttons 1 and 2 for 10 seconds. | ||
| Parts of the unit are working slowly | Constricted, broken or punctured air lines | Check the airlines |
| Compressor pressure is low | Ensure no part of the unit is resting upon the airlines | |
| Reduction in air pressure | Water trap filters | Check visually every 3 months and replaced as required |
| Eyes are not working | Dirty or broken eye | Clean and re-check, replace if required |
| Eye cables broken or frayed | Replace cable from auto box to eyes | |
| Not automatically drafting or releasing | Comms cable fault | ommunication cable from indicator to unit is damaged or has dirty terminals – clean terminals |
| Incorrect indicator settings | Communications cable is in the wrong port | |
| Check your indicator settings are correct |
Scale Indicator Issues
| Symptom | Possible Causes | Possible Solutions |
|---|---|---|
| The Indicator displays ------------- | There is a problem with the load bars | Contact the Load Bar manufacturer. |
| Indicator read out is fluctuating or not zeroing | Plugs not completely connected | Check the plug that goes over the load bar collar is not preventing the pins from engaging properly |
| Plugs are damp | Check load bar cables are firmly in place, don’t over tighten | |
| Check for moisture – clean with methylated spirits | ||
| Ensure dust caps are screwed together | ||
| Battery is not adequately charged | Check battery charge state | |
| Check indicator to unit cord | ||
| Unit is damp | Electrical interference from a short on a electric fence can affect your indicator | |
| Electrical interference | Battery and unit charges must be kept dry | |
| Tru-Test Indicator displays wait for trigger | Dirty eyes | Clean eyes |
| Faulty Y or Comms cable | Check the Y and Communications cables and the cables pins for damage, replace if required |
Health & Safety
Warning Crush Hazards
The Racewell Drafter has moving gates positioned at both the front and rear of the unit. Keep your hands clear to avoid the risk of a crush injury when the machine is operational.
Entry Gate Crush Hazard
The Entry Gate opens and closes automatically so ensure that you do not put your hands in this area during operation.
Drafting Gate Crush Hazards
The Drafting Gates open and close automatically so ensure that you do not put your hands in this area during operation.
Note: If a stock prodder is used to work stock with the machine, the warranty is void as the current can damage electrical componentry.
EC Declaration of Conformity
(According to Annex II.1.A of the Machinery Directive).
Te Pari Products Ltd hereby declares as the manufacturer that the Racewell Auto Sheep Drafter meets the provisions of the following Directives:
Machinery Directive (2006/42/EG)
And furthermore declares that (parts of)the following harmonised standards have been applied:
| Standard | Description |
|---|---|
| ISO 14120: | Safety of machinery – Guards – General requirements for the design and construction of fixed and movable guards. |
| IEC 60204-1: | 2006 Safety of machinery – Electrical equipment of machines Part 1 : General requirements. |
| ISO 13849-1: | Safety of machinery – Safety-related parts of control systems Part 1 : General principles for design. |
| IEC 61310-1: | 2008 Safety of machinery. Indication, marking and actuation. Part 1 : Requirements for visual, auditory and tactile signals. |
| IEC 61310-2: | 2008 Safety of machinery. Indication, marking and actuation. Part 2 : Requirements for marking. |
| ISO 4414: | 2010 Pneumatic fluid power – General rules and safety requirements for systems and their components. |
| Manufacturer | Address | Country | Responsible |
|---|---|---|---|
| Te Pari Products Ltd | 9 Endeavour Crescent, Oamaru, Otago 9494 | New Zealand | Patrick Blampied |
Product Warranty
We stand by our products and services!
We offer a manufacturer's warranty on all our products for peace of mind.
See our website for details of what’s covered in your warranty and a form to submit a warranty claim.
If there ever is an issue with anything associated with our equipment, we don’t avoid it like other companies may do. Our qualified Technical Support team provides the best service possible, with quick responses and flexibility for your needs. It’s the Te Pari difference… ‘trustworthy customer support’.
HOT DIP GALVANIZING
Any Hot Dip Galvanizing on your Te Pari product is warranted for 10 years from the date of purchase from Te Pari. Refer to warranty terms for more details: www.tepari.com/owners-hub/warranty/
STRUCTURAL
Any steel work or structural fabrication on your Te Pari product is warranted for 3 years from the date of purchase from Te Pari. Refer to the warranty terms for more details.
POWERED COMPONENTS
Any powered components (pneumatic/hydraulic/electronic) on your Te Pari product are warranted for 12 months from the date of purchase from Te Pari. Refer to the warranty terms for more details. Registering your product online qualifies you for an additional 12 months' extended warranty for FREE.
Warranty repairs or replacements
Any warranty repairs or replacements are to be authorized by Te Pari before proceeding.


